
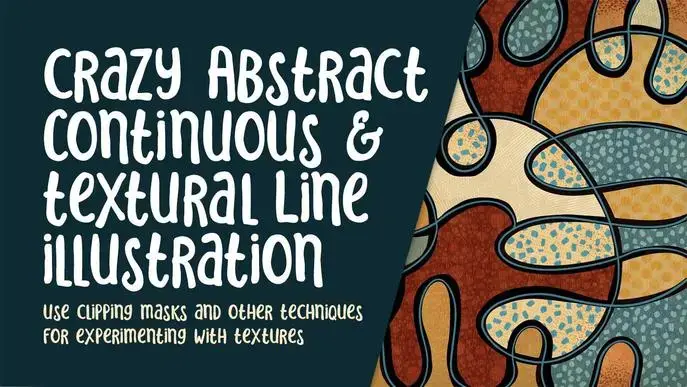
Abstract Continuous Line Art Journal Page and 20 Texture Brushes, Other Assets and Free Palettes

Self-paced course
Price
Rating
Overview
Once in a while, it is fun to create just for the sake of creating. I was doodling one night, just passing the time, and I produced a fun, meandering line art piece. My first one was really messy and unfinished looking, but I could see that the techniques were something I could use to produce a fun project for a class. It gave me the chance to experiment with my Inky Business Brush Set, and to have fun with layering and textures. I provide enough of a selection of brushes that you should be able to try everything I suggest in class. I am also offering the discount INKY-50%-OFF to all students. That's 50% off the already half-off set. Find it here.
In this class I’ll walk you through:
- my step-by-step method for creating the line art
- tips for filling in all the areas produced when lines crossed
- my workflow for use of layers and other great features like clipping masks for adding color and texture.
- adjusting textures and overlays with the use of hue and saturation and later, blending modes
- methods for keeping the art fully editable for later adjustments and recoloring
If you’ve got a good basic knowledge of Procreate, you’ll be able to go through all the steps. This class will benefit anyone who wishes to simplify selections and methods to improve efficiency. I also think that a project like this helps to reinforce what you know and to make judgements on what improves composition and unity.
The key concepts I will includ e:
- review of brush making to create simple textures on the spot
- combining textures for a unique look
- approaches you can take to unify the final piece and then ideas for how to use it
Learning new Procreate workflows always leads to further exploration and ideas. This is a great opportunity to experiment and even think in terms of how you could use the finished pieces. It gets faster to do as you practice, and it might be fun for you to create a quick series for use in other areas of your design business, if that is your cup of tea.
Intro to Abstract Continuous Line Art Journal Page
This short intro will give you an overview of the class. I will show you a few pieces for inspiration.
Lesson 1: Inspiration and Creating the Continuous Black Line
In this lesson, I will give an overview of the document set-up. I have included the color palettes in the class assets so you can try one of those if you would like. We look at some inspiration on Pinterest and then we have a go at creating the black lines with brushes I provide from my Inky Business Brush Set.
Lesson 2: Filling in the Color Areas
In this lesson, I will break down the complete process of adding the color to the finished line work. I explain my methodology for doing this and explain how to fill the areas quickly. At the end of the lesson, I assess my piece and talk about why I change certain things to help the over-all composition.
Lesson 3: Adding the White Line
In this lesson, I will explain the settings and sizing of the brushes in relation to the look we are trying to achieve. I will show you some of the key techniques I use for adding the highlight or decorative white line and explain every step of the way. By the end of the lesson, you will have the white line complete. I show you a method to be sure the white line is framed on both sides with black.
Lesson 4: Create Patterns for Use as Textures
This is the lesson in which I teach you about creating a seamless tile for quick textures. I show you the quickest method I know and then we will use that new texture to fill an area. I decided the easiest way was to separate out the color areas and use a clipping mask for the texture. I show you how I back-track and do all the separations in the next lesson.
Lesson 5: Methods for Adding More Textures
In this lesson, I will show you how to separate each of the sections of color. I decided, after the fact, to do this, so you see all my troubleshooting. I figure this method is ultimately less time-consuming, so I made a unilateral decision at that point to change my strategies.
Lesson 6: Filling in with Additional Details
At this stage, we continue to pull our layout together. I will add many new textures, all the while explaining why I make certain choices. This will show you just how versatile this technique can be and how valuable experimentation is in your development. Try different color combos, and also combinations of textures for some sections.
Lesson 7: Pointillism and Experiments with Blending Modes
I will demonstrate the use of the included pointillist brushes. They allow us to produce somewhat of a textured gradient. Once we create a few sections like that, we will also use blending modes to unify them. This lesson has us completing the textures everywhere and talking about unifying the design. Our last step, which we will do in the next lesson, has us adding an over-all texture to the entire document.
Lesson 8: Adding a Unifying All Over Texture
Adding a unifying texture is the first part of the lesson. We cover much more than that as I give you many options for making changes and adjusting the over-all look and feel of the finished art. I give you a bit of a pep talk at the end.
Lesson 9: Conclusion, Wrap and Debrief
We will conclude everything in this lesson. I show you a couple of quick mock-ups with the artwork in some of the different iterations I suggested. We end with a chat about next steps
Concepts covered:
Concepts covered include but are not limited to Procreate design, Procreate Patterns with brushes, layering, transparency, blend modes, Procreate brush stamps, Procreate canvas settings, Procreate snapping and guides, the Brush Studio in Procreate, adjusting Procreate brushes, sizing of documents and brushes, compositions with textural brushes, adding texture with brushes, procreate brushes for adding other interesting details, workflow best practices, painting best practice, Procreate composites, techniques with paints and blending, and much more.
You will get the bonus of…
- 1 hour of direction from an instructor who has been in graphic design business and education for over 40 years
- knowledge of multiple ways to solve each design challenge
- an outline, color swatches and a brush set with 20 brushes
Similar courses


Featured articles
158 students
English
Beginner


