
Packaging Design: Revamp a Brand to Dive off the Shelf

Self-paced course
Price
Rating
Overview
This class will leave you with a new-founded love for packaging design. Whether you're a beginner-designer looking to learn the process from A to Z or a seasoned designer looking to level up their skills or you're a packaging enthusiast and you're just curious about the overall process, this class is for you!
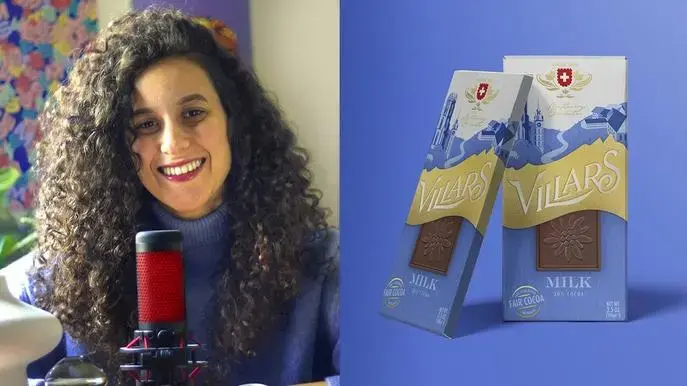
I’m Khadija El Sharawy, a freelance graphic designer specialized in branding and packaging and I'm so excited to be taking you on this ride to show you my process on how I redesign this famous chocolate brand into a more revamped, luxurious packages.
Who is this class for?
This class is mainly for designers who want to level up their skills in packaging design or beginners who want to learn about the overall process. I designed the class in baby steps so it's digestible and engaging for any level you're at. You're guaranteed to walk away with something new that you'll learn.
Pre-required Skills:
- Good knowledge in Adobe Illustrator
- Good knowledge in Adobe Photoshop .
What are we covering in this class?
1- Three Principles of Packaging Design:
Before we dive in to the design process, you’ll be learning the 3 principles of packaging design to get a good overview of what separates good packaging from great packaging. This is supplemented with examples and references from award-winning designs.
2- Picking a Product:
I’ll be taking you through the product I’ve picked out for this class that I’ll be redesigning its packaging for. And we’ll be analyzing its visual assets and evaluating what’s working and what can be improved and why.
3- Competitor Analysis:
This is a brief, strategic lesson where we’ll be going over the competitor brands of the brand I’ll be working on to get an overview of what patterns they’re using in that market and how we can take those insights in our design in order to stand out from its competition.
4- Starting Point:
We’ll then take the insights from the previous two lessons and start building an action plan that will help us move forward and it will act as our guide throughout the design process.
5- Research & Moodboard:
With our action plan next to us, we’ll be doing some visual research of elements that we can take onto our design and also pull out visual references of typography, illustration styles, layout…etc to inspire the direction of the design.
6- Thumbnail Sketches:
Now we start creating! Grabbing a paper and a pencil, I’ll be demonstrating my process and thoughts while creating thumbnail sketches. Seeing how to filter out options that don’t work and picking options that do work.
7- Refined Sketch:
After settling on a thumbnail sketch, I’ll be demonstrating how we can refine that sketch into a bigger format to finalize our composition using colors.
8- Digitizing Pt.1 (Front):
After transferring our sketch onto Adobe Illustrator, we’ll be digitizing the sketch using the pen tool mainly and start layout out our composition, refining the logo, drawing our elements picked from the moodboard, retouching the product shot on Adobe Photoshop and adding colors and typography.
9- Digitizing Pt.2 (Back):
In this lesson, we’ll be designing the back of the pack as it is an important element and should be treated as a continuation of the story on the front.
10- Mockups:
Now that you’re all set, we’ll be looking at mockups I’ve picked out and start layering our design on the mockups and learn how to add shadows and textures to really elevate the pack and deliver a top-notch presentation.
11- Beyond The Pack:
This is an extra step that I wanted to share with you because I think it’s really important and in this lesson you’ll learn how to take the brand beyond the packaging and apply all the elements that are designed on the pack on further applications to show how the brand can travel off-pack and create meaningful connections with its target audience. At the end of this lesson, there’s also a tailored brand video that encapsulates the results of the entire design process.
12- Your Turn:
And finally– you guessed it! It’s your turn. I’ll be assigning you your class project where you’ll pick any tea product of your choice and redesign its packaging. I wanted the category of the project to be consistent (tea) but the brand choice is totally up to you. Pick any brand from whatever you are in the world and apply all the steps you learned from class and share your project in the project gallery! I’ll be also sharing tons of resources that can help you in this lesson.
13- Conclusion:
The conclusion lesson is going to wrap up for you all the lessons in the class in 10 quick steps to refresh your memory and get you going! I’ve also attached the conclusion in the Resources section so you can have it at hand.
Similar courses


Featured articles
625 students
English
Beginner


